




Motorcycle Mirrors with Turn Signals: Fitment, Wiring & How to Choose

Introduction
Choosing motorcycle mirrors with turn signals starts with three checks: the mounting hardware, the lighting functions, and the motorcycle's electrical system. Some models provide turn signals only; others also include running lights or sequential indicators. This guide compares KiWAV options and explains what to confirm before ordering, including wiring and whether your setup may need an LED-compatible flasher or load equalizer.
Turn Signals, Running Lights and Sequential Indicators: What Is the Difference?
• Turn signals
These flash when you activate the left or right indicator. Confirm whether the selected mirror provides turn signals only or also includes a running-light function.
• Running lights
These remain illuminated during normal operation. Their color and brightness depend on the product version. Mirror running lights help other road users notice the motorcycle; they are not a substitute for a headlight or a dedicated road-illumination lamp.
• Sequential indicators
These illuminate in a moving sequence when signaling. "Sequential" describes the lighting pattern—it does not mean the mirror fits every motorcycle or eliminates the need to check electrical compatibility.
Choose the exact lighting version before ordering. Similar-looking mirrors can have different functions, wiring and included accessories.
Before You Buy: Check Mounting and Electrical Compatibility
• Match the mounting hardware
For threaded mounts, confirm the thread diameter, pitch and direction on both sides. For fairing mounts, check bolt spacing, mounting angle and base dimensions. Select the exact fitment version; the motorcycle brand alone is not enough.
• Check the rear view and clearance
Compare mirror dimensions and adjustment range. Confirm that the mirrors and wiring clear the tank, windscreen, levers and other controls throughout the steering range.
• Identify each lighting connection
Follow the selected product's wiring instructions. Identify ground, turn-signal input and running-light input where fitted. Do not assume every LED mirror has only two wires or that matching wire colors means matching functions.
• Confirm electrical compatibility
Check the specified voltage, connectors and the motorcycle's turn-signal control system. Whether you retain or replace the original indicators can affect compatibility. An LED-compatible flasher or load equalizer may be needed for some setups; confirm the requirement before buying accessories.
• Confirm the intended use
Check the selected product's approval information and the requirements where you ride before replacing original mirrors or indicators.
Installing and Wiring LED Turn-Signal Mirrors
Use this checklist alongside the instructions for your exact mirror version and your motorcycle's service manual. Wire functions, connectors and installation procedures can differ between models.
Step 1: Mount the mirrors without twisting the wires
Switch off the ignition and follow the motorcycle's service procedure for isolating electrical power before making connections.
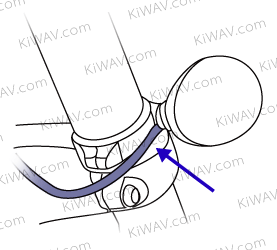
Fit the correct mounting hardware and position the mirrors before securing or taping the wiring. Keep the wires free while tightening threaded mounts so they do not twist inside the mirror stem.
Leave enough slack for adjustment and full steering movement. Check that no wire is pinched under the mounting hardware.
Step 2 & 3: Connect the lighting inputs and ground
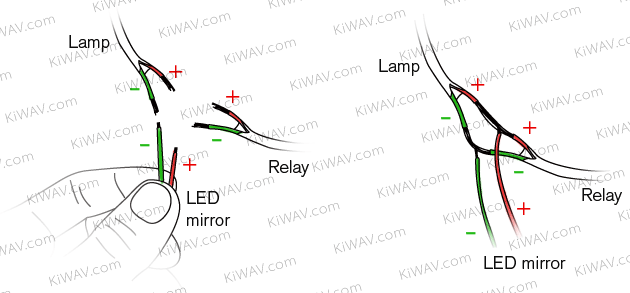
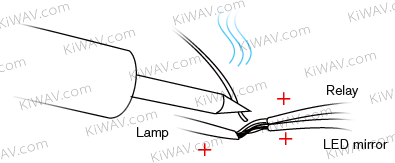
Follow the wiring diagrams for your exact mirror version and motorcycle. Connect the left and right signal inputs, any separate running-light input, and ground as specified. Identify wires by function, not color alone.
Follow the product instructions for any supplied module or diode kit. Confirm voltage, polarity and a secure ground before restoring power.
The illustration shows an example connection; wire colors and layouts may differ by model.
Step 4: Secure and protect the wiring
Use suitable electrical connectors and insulate and seal each connection as instructed. Heat-shrink tubing protects a joint; it does not replace a secure electrical connection.
Route wires away from heat, sharp edges and moving parts. Leave enough slack for full steering movement without pulling or pinching.
Step 5: Check mounting and test the lights
Confirm that the mirrors are secure and adjusted for your rear view. Restore power and test both turn signals, hazard lights and any running-light function. Check that the original lights still work correctly.
If a light stays on, flashes unusually fast or does not illuminate, switch off the power and check the wiring and compatibility. Do not swap wires by trial and error.
Do LED Turn-Signal Mirrors Need a Load Equalizer?
Not always. The requirement depends on the motorcycle's year, turn-signal control system and whether the original indicators remain connected.
Some setups may need an LED-compatible flasher or a suitable load equalizer; others may support a manufacturer-specified relearn procedure. Check the wiring and ground before choosing an additional component.
In one documented KiWAV case, a rider's 2002 Harley-Davidson Sportster mirror signals stayed on without flashing. The rider confirmed that a NAMZ LE-03-A load equalizer resolved the issue. This result applies to that installation, not every Harley or KiWAV mirror.
Read the 2002 Sportster case study.
Compare KiWAV Turn-Signal Mirror Options
Start with the mounting type, then choose the lighting function. The examples below refer to specific product versions.
| KiWAV option | Mounting | Lighting and wiring |
|---|---|---|
| Lucifer sequential LED — metric M8/M10, carbon pattern | M8 × 1.25 or M10 × 1.25. Includes standard- and reverse-thread bolts; match both sides of your motorcycle. | White running lights and amber sequential signals. Separate running-light and signal connections. The product instructions distinguish use alongside existing indicators from use as the only indicators. |
| Arrow LED — Harley-compatible, black | 5/16"-24 stem mounting. Check the listed model exclusions before ordering. | Amber LEDs described for indicator or running-light use. Do not assume this version provides both functions simultaneously; confirm the required wiring and accessories. |
| Flash LED — Harley running-light + indicator version | Harley-specific version. Select the product option and confirm its mounting specifications for your model and year. | Combines running lights and turn signals, with running lights at approximately 50% intensity. Follow this version's wiring instructions. |
A matching mount does not confirm electrical compatibility. Check any flasher or load-equalizer requirement against your motorcycle's control system and whether the original indicators remain connected.
Browse all KiWAV mirrors with turn signals.
Need help choosing? Send KiWAV your motorcycle's make, model, year, mounting photos and whether you plan to retain the original turn signals.


Comments